URL redirection from IIS to Tomcat
One of the cleaner ways of hosting our web applications is to mask the port number and abbreviate the URL so that the end users who like to memorize the URL, it will be easy.
Like for example:
Original URL: https://servername:8443/application1/sub-context/app/index.html
URL 1 with masked port#: https://servername/application1/sub-context/app/index.html
URL 2 with masked port# as well as shortened: https://servername/appRedirect (The end user will hit this URL and it will be redirected to the URL 1.
Its a two step process:
1. Masking Port number: The port numbers 443 and 80 are standard default HTTPS and HTTP ports which are directly recognized by IIS even without even specifying them.
I hosted my Flex based web application on Apache Tomcat 7.x server on HTTPS port 8443 and i wanted to prevent users from typing in the port number each time they access the application as well as for security reasons its not advisable to display the port number to the end users.
In order to accomplish this, i came across a very useful tool called as ISAPI Tomcat redirector.
- Please download the tomcat-connectors-1.2.32-windows-i386-iis.zip from http://www.apache.org/dist/tomcat/tomcat-connectors/jk/binaries/windows/ and place it in a suitable and accessible location.
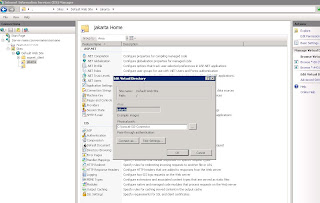
- Using the IIS management console, add a new virtual directory to your IIS/PWS web site. The name of the virtual directory must be jakarta. Its physical path should be the directory where you placed the redirector plugin DLL,
isapi_redirect.dll(for example c:\jakarta-tomcat\bin\native). While creating this new virtual directory, assign it with execute access. - Add the redirector plugin DLL,
isapi_redirect.dll, as a filter to your IIS/PWS web site. The name of the filter should reflect its task (for example, "Jakarta Redirector"). Its executable must be the redirector plugin DLL,isapi_redirect.dll.
- You can use the IIS Management console to add the filter.
- Please make the following settings as well in IIS
- Restart IIS/PWS (stop + start the IIS service).
Adding additional Contexts
The examples context is useful for verifying your installation, but you will also need to add your own contexts. Adding a new context requires two operations:- Adding the context to Tomcat (This is covered in the Tomcat User's Guide).
- Adding the context to the Tomcat redirector plugin.
Adding a context to the Tomcat redirector plugin is simple, all you need to do is to start Tomcat 3.3 with "jkconf" option specified again. After the worker map file is rewritten, restart IIS/PWS.If you are using a manually modified URI to worker map file, edit the file to add a line that looks like:/context/*=worker_nameWorkers and their name are defined in workers.properties, by default workers.properties comes with 2 pre-configured workers named "ajp13" and "ajp12" so you can use it. As an example, if you want to add a context named "shop", the line that you should add to uriworkermap.properties will be:/shop/*=ajp13After saving uriworkermap.properties restart IIS/PWS and it will serve the new context.Example:# uriworkermap.properties - IIS
# /*=ajp13w -> default
/admin/* =wlb
/manager/*=wlb
/examples/*=wlb
/App1/*=wlb
/jkmanager=jkstatus
The Tomcat Redirector Plugin Configuration Settings
The following is an example isapi_redirect.properties file which contains the working settings for Tomcat 7.x from a working application.# Configuration file for the Jakarta ISAPI Redirector
# The path to the ISAPI Redirector Extension, relative to the website
# This must be in a virtual directory with execute privileges
extension_uri=/jakarta/isapi_redirect.dll
# Full path to the log file for the ISAPI Redirector
log_file=C:\tomcat-IIS-Connector\logs\isapi_redirect.log
# Log level (debug, info, warn, error or trace)
log_level=debug
# Full path to the workers.properties file
worker_file=C:\tomcat-IIS-Connector\workers.properties
# Full path to the uriworkermap.properties file
worker_mount_file=C:\tomcat-IIS-Connector\uriworkermap.properties
rewrite_rule_file=c:\tomcat-IIS-Connectors\rewrites.properties
How does it work?
- The IIS-Tomcat redirector is an IIS plugin (filter + extension), IIS loads the redirector plugin and calls its filter function for each in-coming request.
- The filter then tests the request URL against a list of URI-paths held inside uriworkermap.properties, If the current request matches one of the entries in the list of URI-paths, the filter transfers the request to the extension.
- The extension collects the request parameters and forwards them to the appropriate worker using the ajp1X protocol.
- The extension collects the response from the worker and returns it to the browser.
References:


Comments